Switches are an integral part of every network as they connect devices and enable them to communicate.
There are two kinds of switches, namely unmanaged and managed. Unmanaged switches are plug-and-play devices that require no configuration. At the same time, they are suited only for basic connectivity, often in home networks or in places that require only a limited number of ports, such as a conference room.
Managed switches, on the other hand, provide higher security, and they come with advanced features. Also, these switches can be configured to meet your specific requirements, which works well for large organizations where security and quality of service are key metrics.
One of the most popular switches available today is Cisco switches, as they come in many types to suit different needs and environments. They also offer many open, programmable, secure, and intelligent deployment options to give you the right networking tools for next-gen networks.
That said, Cisco switches are complex to configure and require in-depth knowledge in this field. This is why we will show you how to configure them step-by-step.
Step #1: Check your Hardware
As a first step, check your Cisco switch make a note of its model, and ensure that it’s in working condition if it’s an old one. Also, check the cables and the devices to which it will connect to ensure they are all working correctly.
This step can make it easy to identify the cause of a problem and identify the malfunctioning device.
Step #2: Connect the Switch to a Console
Next, connect your switch to a console, typically a terminal emulation tool like PuTTY. As soon as you connect, you will get a prompt with the words “Switch>”. This is proof that your switch is now connected to a console.
To start accessing the switch, type “enable” followed by ENTER. If you’re logging in for the first time, you get the privilege EXEC mode by default, and no passwords are required either. However, you can configure the switch later to have a password for logging into this mode.
Step #3: Create a hostname
Once you’re in the EXEC mode, move to the Global Configuration Mode with this command.
Switch# configure terminal
With this command, you’re all set to configure the switch to meet your specific requirements.
As the first step in configuration, create a hostname for your switch to identify it within your network uniquely. To do this,
Switch(config)# hostname switch

Switch(config)#
Note that the hostname is expected to be something professional in a working setup, and also, it must be easy to remember. Therefore, follow the prevailing naming standards and conventions to choose your name. Check if your company has any preset policies in this regard.
Step #4: Set up Passwords
After the hostname, the next step is to create a password to give access to EXEC privilege. For this password, use the following command.
Switch(config)# enable secret strongpassword
Remember this password, as you’d need to enter this to log into the EXEC mode.
Similarly, configure a password for both telnet and console for added protection.
The command for configuring a password in telnet is,
Switch1(config)# line vty 0 12

Switch(config-line)# password strongtelnetpassword

Switch(config)#
Similarly, the command for setting up a password in the console is,
Switch1(config)# line console 0

Switch(config-line)# password strongconsolepassword

Switch(config)#
Step #5: Configure the Default Gateway
Use the following command to configure the default gateway.
Switch(config)# ip default-gateway IP-address

Switch# show ip route
You can also determine the IP addresses that can access the switch through telnet. To do this,
Switch(config)# ip access-list standard TELNET-ACCESS

Switch(config-std-nacl)# permit 8.8.8.8

Switch(config-std-nacl)# permit 8.8.8.8

Switch(config-std-nacl)# exit
In the above step, you have laid down the IP addresses that are permitted. Next, associate this list with your telnet line. The command for that is,
Switch(config)# line vty 0 12

Switch(config-line)# access-class TELNET-ACCESS in

Switch(config-line)# exit

Switch(config)#
With this, you have configured your default IP addresses and determined the IP addresses allowed through telnet.
Step #6: Configure the Static Route
A static route comes in handy to route packages when no routes are present in the routing table. The advantage of configuring this is that the switch can send all packets through this route, especially when the dynamic routing table is not present or doesn’t have specific routes.
The command for configuring the static route is,
Switch(config)# ip route destination_IP_address mask

Switch# show running-config
Step #7: Disable Ports
Next, disable the ports that you think are not needed. While this is not necessary, it can add an extra layer of security.
In this example, let’s assume we have a 96-port switch and don’t want to use port numbers 75 to 90. The command to disable them is:
Switch(config)# interface range fa 0/75-90

Switch(config-if-range)# shutdown

Switch(config-if-range)# exit

Switch(config)#
Step #8: Configure the Interface Description
The command to configure the interface description is:
Switch(config)#interface interface_name 0/1

Switch(config-if)#description brief_description
Step #9: Set the Duplex Mode
Duplex mode allows the switch to send and receive data, making your switches more efficient in the entire data transfer process.
You can set this mode with the following command.
Switch(config-if)#duplex full
Step #10: Save the Configuration
Once you’ve set up the configuration, it’s time to save them and exit from this mode.
Switch(config)# exit

Switch(config)#
With this, your configuration is complete.
As you may have realized, setting up this configuration is complex. Also, it is not well-suited for all kinds of users as it requires advanced technical skills to pull off.
This is why you’re better off using third-party tools that come with a simple interface. Many of the mandatory processes are handled automatically while the interface takes inputs for user-defined values.
Here is our list of third-party tools that can take care of configuring Cisco switches:
- SolarWinds Network Configuration Manager – FREE TRIAL This tool handles your configurations, regularly monitors them for changes or misconfigurations, and informs you in real-time, so you can take the necessary action just when needed. Start a 30-day free trial.
- ManageEngine Network Configuration Manager – FREE TRIAL An automated network configuration tool that gives complete control over the entire lifecycle of device configuration management. Download a 30-day free trial.
- Cisco Configuration Assistant A configuration tool from Cisco that automates the configuration process, improves network security, and reduces deployment time.
- WeConfig A network configuration tool that simplifies and manages network configuration.
Our methodology for selecting Cisco configuration tools and software
We reviewed various Cisco configuration tools and analyzed the options based on the following criteria:
- Support for a wide range of Cisco products
- Robust access control
- Ability to monitor changes and alert when changes are made
- Support for auditing and reporting
- A facility to analyze network performance over time
- Graphical interpretation of data, such as charts and graphs
- A free trial period, a demo, or a money-back guarantee for no-risk assessment
- A good price that reflects value for money when compared to the functions offered
Let’s take a brief look at each of these tools.
1. SolarWinds Network Configuration Manager – FREE TRIAL
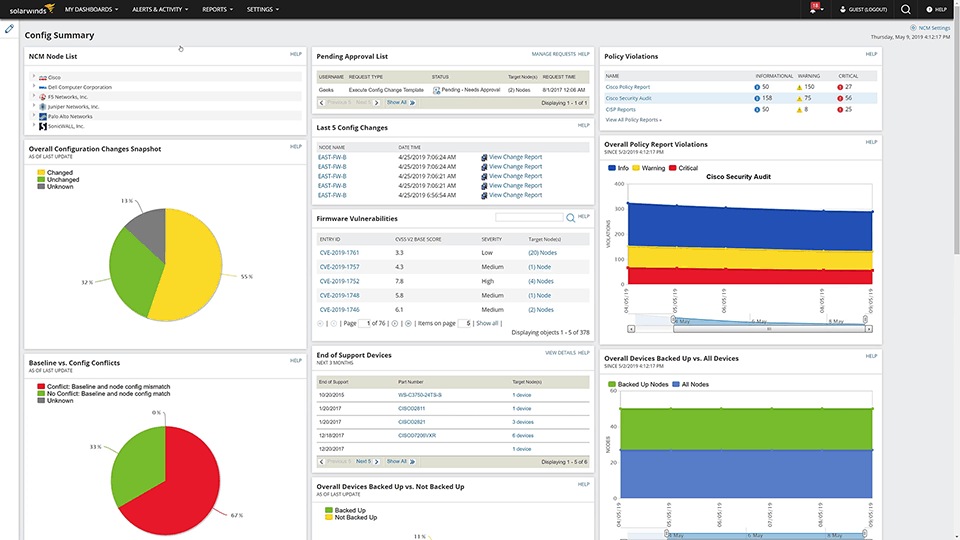
The SolarWinds Network Configuration Manager is an automated tool for handling all your network configurations, including network switches. It reduces costs, saves time, and at the same time, gives the right configuration for your organization.
Key Features
The features of the SolarWinds Network Configuration Manager are:
- Its automated configuration settings ensure high levels of network uptime and reliability
- Backs up and monitors router and switch configurations
- Simplifies the entire configuration process to save time and effort
- Manages switch configurations for greater productivity
- Continuously monitors changes to identify misconfigurations
- Identifies and resolves configuration drifts within your organization
- Compares the configuration among switches to identify changes
- Makes it easy to track device configuration changes
- Stays up-to-date on inventory changes
- Works well across different vendors, and various types of switches with the same vendor
- Reduces network change management time and errors
- Uses automation to manage compliance
- Scales well across hundreds and even thousands of switches
- Optimizes the performance of your network infrastructure
- Scans and identifies vulnerabilities
- Leverages configuration templates to ease the workload
- Provides real-time alerting in case of any changes
- Troubleshoots configurations as needed
- Automatically handles updates to Cisco OS changes
- Supports VLAN configuration and troubleshooting
Why do we recommend it?
The SolarWinds Network Configuration Manager will help you standardize the configuration of your Cisco switches, store that setup as an image, and then scan your switches for unexpected changes. The tool will restore the official image if any changes are detected.
Who is it recommended for?
This tool isn’t limited to backing up and protecting the configurations of Cisco switches. It can also back up routers and the network devices provided by other suppliers. The configurations of switches and routers can be used to implement a range of security measures and hackers target those settings to make their ingress easier.
Pros:
- Built for medium to enterprise-size networks, with features designed to streamline troubleshooting and revert config settings quickly
- Can automatically discover new devices on the network and provide templated health reports for immediate insights upon installation
- Offers configuration management, allowing teams to quickly backup and restore changes that may have impacted performance
- Can monitor settings for unauthorized changes and specific teams or managers
Cons:
- Not designed for home networks, this is an enterprise tool built for system administrators and network technicians
SolarWinds Network Configuration Manager starts at $1,687. You can try SolarWinds Network Configuration Manager for a fully functional 30-day free trial.
2. ManageEngine Network Configuration Manager – FREE TRIAL
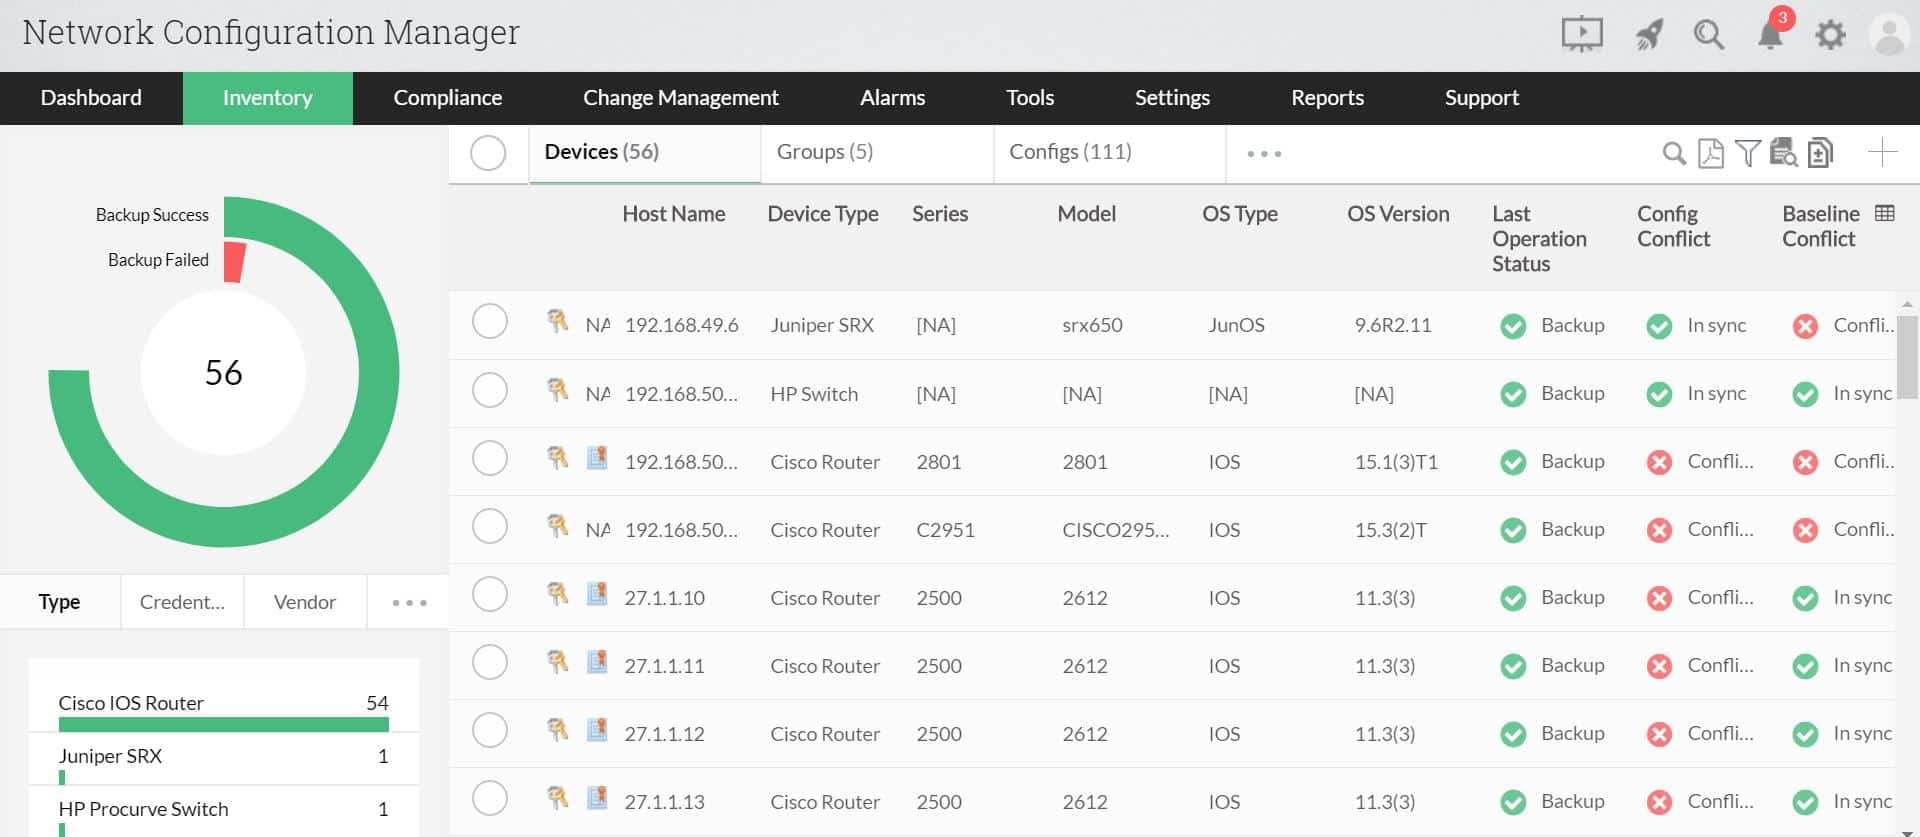
ManageEngine Network Configuration Manager is an automated tool designed for switches, routers, firewalls, and other network devices, and it handles not just configuration but also change management and compliance.
Key Features
The features of Network Configuration Manager are:
- Automatically backs up configuration when a change is detected
- Comes with a built-in database backup and disaster recovery system
- Routinely backs up all configuration files
- Sets the optimal configuration settings
- Uses incremental versioning that can help with comparison and analysis
- Secures all configuration files in an encrypted centralized repository
- Implements role-based access control for enhanced security
- Improves visibility to configuration changes
- Sends alerts in case of suspected behavior, especially when an unauthorized user makes configuration changes
- Comes with a rollback mechanism to ensure that your configurations are stable at all times
- Provides an approval mechanism
- Automates repetitive operations and applies them to all the devices as configured
- Stays compliant with industry standards such as PCI, HIPAA, and more
- Generates descriptive reports that help with compliance and capacity planning
- Records user activity to enhance accountability
Why do we recommend it?
ManageEngine Network Configuration Manager is a close rival to the SolarWinds system. You can use it to back up the configurations of switches and routers from any network hardware supplier, not just Cisco.
Who is it recommended for?
This tool has a few advantages over its SolarWinds competitor. Above all, this software will run on Windows Server, Linux, and AWS, while the SolarWinds system is only available for Windows Server. ManageEngine offers a Free edition but that is limited to managing two devices. Paid bundles range from a 10-device license up to multi-site coverage.
Pros:
- Offers firmware vulnerability management alongside configuration monitoring
- Can immediately alert when changes occur inventory or configuration changes are made
- Can neatly organize networks, devices, and infrastructure to support multi-site use
- Offers access control to help enforce compliance standards
- Available for Windows, Mac, and Linux systems
Cons:
- Is a full-service monitoring platform that can take time to fully explore all options available
Download a 30-day free trial.
3. Cisco Configuration Assistant
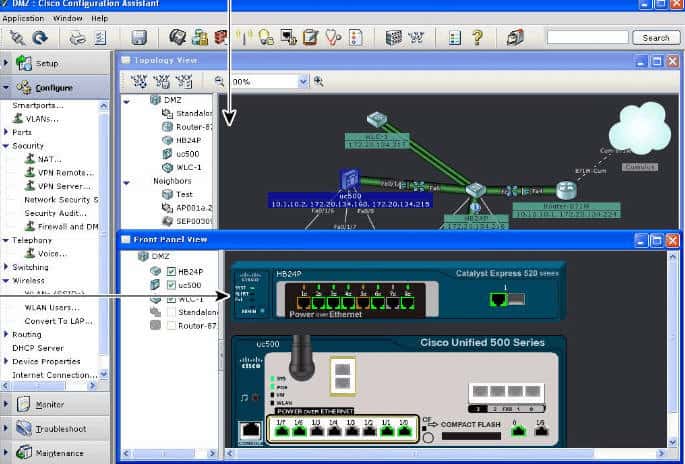
Cisco Configuration Agent (CCA) is a free wizard from Cisco that handles all your configurations and their changes.
Key Features
The features of CCA are:
- Simplifies the task of deploying, administering, and configuring all Cisco devices
- Provides support for the Cisco Smart Business Communication Systems
- Sets up your configurations using wizards
- Offers multiple network views
- Simplifies reporting and analytics
- Provides the option to upgrade with an intuitive drag-and-drop editor
- Handles troubleshooting as needed
- Substantially reduces deployment and configuration time
- Improves network security and performance
- Comes with a well-designed GUI
Why do we recommend it?
Cisco Configuration Assistant is a clear choice for any business that has Cisco switches because it is produced by Cisco specifically to aid its customers in managing the configuration of their switches. It isn’t limited to managing switches but will also help with the configuration of other Cisco devices, such as routers and firewalls.
Who is it recommended for?
This tool seems like a great offer because it is free. However, you need to dig a little deeper to get the full story – many of the most attractive features are not available in the free version. You have to upgrade to the paid version to get the graphical drag-and-drop device connection manager and other such utilities. Also, the tool won’t monitor your devices for unauthorized changes.
Pros:
- Completely free tool
- Can monitor a range of Cisco devices including phones, firewalls, APs, and more
- Is a lightweight tool that uses few resources
Cons:
- Not ideal for those looking to monitor outside of the Cisco realm
Click here to download the Cisco Configuration Assistant for free.
4. WeConfig
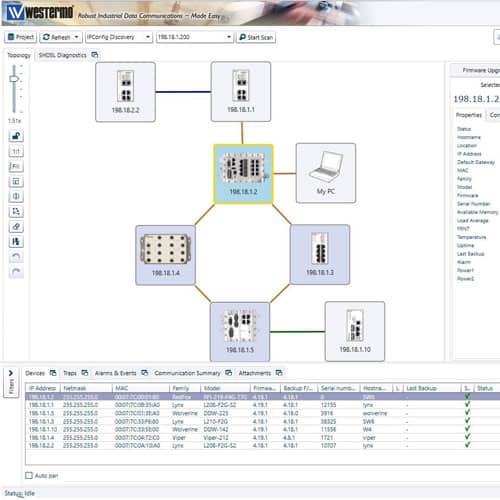
WeConfig is a network configuration and maintenance tool that is simple and reliable and works well across different platforms and devices.
Key Features
Some of the features of WeConfig are:
- Saves a ton of time in the initial installation as well as in ongoing maintenance of Cisco switch configuration
- Automates the configuration process
- Allows configurations to be deployed in bulk
- Minimizes the risk of configuration errors and, through it, brings down the risk of downtime
- Optimizes security by making appropriate suggestions
- Sends alerts when unauthorized users made any changes to the configuration
Why do we recommend it?
WeConfig is provided by Westermo, a supplier of network devices and equipment. The tool is free to use and it helps you to plan out your network and access the management interface of each device. The graphical interface of the system provides some standard configuration requirements that, if you select them, will be interpreted into configuration commands in the device.
Who is it recommended for?
Although you don’t need to be a Westermo customer to download the tool, you won’t get any benefit from the discovery and configuration management features in the tool if you don’t have Westermo network devices. The tool only communicates with network devices supplied by the company.
Pros:
- Sleek and simple interface – easy to navigate
- Focused heavily on config automation and provisioning
- Uses simple yet intuitive visualizations to map device relationships and dependencies
Cons:
- Designed for industrial environments – some features may not be applicable to smaller networks
- Can have a steeper learning curve when it comes to automating tasks
Click here to register and download the WeConfig software for free.
Conclusion
In all, Cisco switches are an integral part of most networks today because of their versatility. However, configuring them manually is time-consuming and requires advanced technical skills, not to mention the possibility of errors that can occur at any time.
The good news is many tools can automatically handle this configuration and can even stay on top of their access and maintenance, thereby saving you a ton of time, effort, and resources. Also, these tools can provide granular access to switches and can even send real-time alerts when accessed by the wrong personnel.
These tools reduce the possibility of errors and misconfigurations, and resultant downtimes. They help with compliance as well.
While many tools are available in the market, the tools mentioned earlier are well-known and used extensively for configurations.
Cisco Switches Configuration FAQs
How do I configure a Cisco switch?
To configure a Cisco switch, you can use a command-line interface (CLI) or a graphical user interface (GUI) such as Cisco Network Assistant.
How do I access the CLI of a Cisco switch?
To access the CLI of a Cisco switch, connect to the switch using a console cable and a terminal emulator program, such as PuTTY or HyperTerminal.
How do I access the GUI of a Cisco switch?
To access the GUI of a Cisco switch, enter the IP address of the switch into a web browser and enter your login credentials.
What are the common configuration tasks for Cisco switches?
The common configuration tasks for Cisco switches include setting the hostname, configuring the interface settings, and configuring VLANs.
How do I configure QoS on a Cisco switch?
To configure QoS on a Cisco switch, use the "qos" command in the CLI and enter the appropriate configuration commands.
How do I configure SSH on a Cisco switch?
To configure SSH on a Cisco switch, use the "ip ssh" command in the CLI and enter the appropriate configuration commands.
How do I save the configuration of a Cisco switch?
To save the configuration of a Cisco switch, use the "copy running-config startup-config" command in the CLI.
How do I restore the configuration of a Cisco switch?
To restore the configuration of a Cisco switch, use the "copy startup"