
Encryption has become the de-facto feature of online security today. Almost every company and application seems to use it to encrypt their data to protect it from unauthorized access and manipulation.
The encryption is often based on the Secure Socket Layer (SSL) or the Transport Layer Security (TLS). While this is a great way to protect your data, it can be a nightmare for your Wireshark administrators, who monitor and analyze the data packets that pass through the network.
This article will talk briefly about Wireshark, its encryption strategy, and how administrators can decrypt the SSL layer easily for packet analysis.
What is Wireshark?
In simple words, Wireshark is a free packet analysis tool. It enables administrators to analyze and understand network events microscopic by capturing data packets that traverse through the network and analyzing them for deep insights.
It comes in handy for troubleshooting network problems, identifying vulnerabilities and threats early, software and protocol development, education, and network analysis. Since it works across multiple platforms and operating devices, Wireshark is famous for network administrators today.
However, TLS or its predecessor SSL poses a problem because the incoming packets are encrypted, so the administrator cannot analyze the packets. To overcome this impediment, it becomes necessary to decrypt the SSL layer.
While this may seem daunting at first, there are many ways to decrypt the SSL layer, and let’s look at them.
Capturing Packets on the Client Side
There are many ways to capture the packets for decryption. You could do it on the server side or as a man-in-the-middle, but capturing them on the client-side is probably the simplest way to do it.
You can capture packets on the client side on different operating systems and browsers, but for this article, let’s assume that we will be using the Chrome browser on a Windows 10 operating system.
Set up the Session Keys
The first step is to set up the session keys. To do that,
- Go to your control panel and navigate to System Properties
- Navigate to the Advanced tab and click the Environment Variables button. All the user variables will be displayed.
- To configure a new one, click on the “New” button just below the list. Then, in the dialog box that opens, give the name SSLKEYLOGFILE, and in the value, provide a file path where you want Windows to store this variable.
- Restart the Chrome browser for the client to store the temporary session keys in this log file
- Go to this key log file through Windows Explorer and see if client sessions are being logged in it.
Capture the Packets
The next step is to start Wireshark to capture the packets sent to a site through the Internet.
- Open your Wireshark console and click the Wi-Fi or Local Area Connection you use to access the Internet.
- Now, open your browser and go to any site.
- Move back to the Wireshark console to see the incoming packets. You’ll also see how the session keys are exchanged.
- Analyze the packets on Wireshark and check if any of the packets have used the DNS or TLS protocols
- Look for a simple “Client Hello” and “Server Hello”. Open the two packets, and you’ll see that the client and server used a handshake protocol to establish a TLS 1.3 session. The rest of the contents are encrypted.
This handshake is a crucial way to authenticate for the client and server to authenticate each other. It often starts with the client that sends a message with its TLS version and cipher tool. The server responds to this message with a link containing the server’s public certificate. This, in turn, is validated by the browser to establish a secure connection between the two devices.
Decrypt the Contents
Now comes the next step, where we decrypt the contents.
- Go to the Wireshark console. Navigate to Edit > Preferences
- Look for “Protocols” on the left-hand pane and scroll down to locate “TLS”
- On the right-hand pane, look for an option called the (Pre)-Master-Secret log filename. Click the browse button and select the SSLKEYLOGFILE we created earlier, so its contents get loaded to Wireshark.
- Once you do this, you’ll notice a few extra packets on the Wireshark console.
- Click on the new packets, and you’ll see extra information about the TLS 1.3 protocol, such as the HTTP protocols and other application transactions.
Uncompress the Data
Often, the information transacted between a client and a server is not just encrypted but also compressed. So, you have to uncompress the data to view the packet’s XML contents.
- Look through the packets for the ones that contain “DATA [1]”, “DATA [2]”, or “DATA [1] (text/XML)”. This description indicates that Wireshark has reassembled the contents of the response from the server.
- Navigate down to the Hexadecimal window, and you’ll notice a bunch of Hex values that make no sense
- At the bottom, look for a file called “Uncompressed Entity Body”. Click on this file, and you can see the XML contents instead of the Hex values you saw earlier.
Thus, this is a simple way to create a session key file, feed it to Wireshark, and decrypt the packet’s contents for analysis.
Using a Proxy
Instead of creating a session key file, many organizations prefer to use a proxy to split the TLS connection into two halves. Though it saves time for organizations, it can have security and privacy implications.
The privacy issue is that users can’t opt out of monitoring. This can cause legal problems, mainly when the packets deal with sensitive information such as banking or credit card details.
There’s a single point for viewing all the decrypted content on the security front, which makes it easy for a hacker, as they have to do only a single hack to view all the required information.
These are why decrypting at scale using a proxy is not recommended.
Using an RSA Key
Another option to decrypt SSL is through an RSA key, but it merits note that this method is now deprecated. So, if you were using the RSA key earlier and it doesn’t work anymore, you can conclude that the target machine uses the Diffie-Hellman exchange.
In such situations, you must follow a different set of steps.
Enable SSL Logging
As a first step, enable SSL logging. To do this, create the SSLKEYLOGFILE as mentioned in the previous option and follow the below steps.
- Open your Wireshark and go to Edit > Preferences.
- Look for the Protocols option on the left-hand pane, click it, and navigate to SSL.
- On the right-hand pane, click the Browse button, and select the SSLKEYLOGFILE created earlier.
From this point, all SSL logging will happen in the file.
Look for a Cipher
With your SSL logging turned on, open the browser, and visit any site. All the SSL interactions between the client and the server will be recorded in the log file. Look for a TLS handshake transaction, and as you scroll through this packet on Wireshark, you’ll be able to spot a ciphertext.
If you scroll further down and notice a “Cannot find master secret” message, your best bet is to use the pre-master-secret method described earlier in the article. This is likely to happen if TLS 1.3 is used.
Otherwise, you should be able to see the contents of the file and the cipher used for encrypting it.
While these are some ways to decrypt SSL using Wireshark, they tend to be time-consuming and require extensive technical knowledge.
An easier option would be to use third-party tools that support deep packet inspection and analysis.
Some popular tools that come with this capability are:
- Paessler Packet Sniffing Tool This sensor-based tool allows you to monitor and filter IP packets. Its Packet Sniffer sensor can monitor traffic across all applications.
- SolarWinds Network Performance Monitor A top-notch tool with advanced features to inspect packets at the connection and application levels.
1. Paessler Packet Sniffing Tool
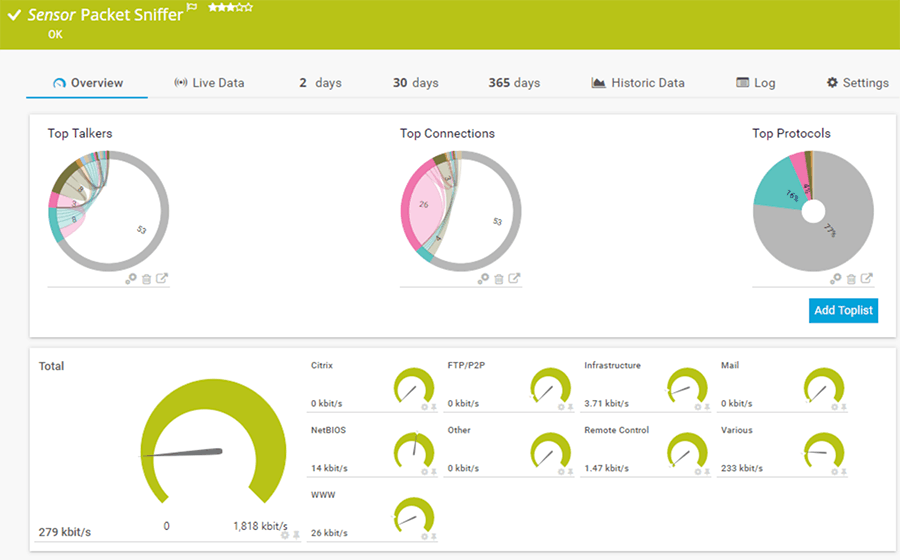
Paessler’s PRTG comes with a packet sniffing sensor that can monitor the packets in web, mail, file, or infrastructure traffic. However, note that it analyzes packet headers only, so the information you glean from it can be limited, depending on what you’re looking for.
Key Features
The features of the packet sniffing sensor are:
- This tool has a high impact on performance, so Paessler recommends no more than 50 sensors of this type
- Works only on a probe device
- Supports the IPv6 protocol
- Allows you to configure a monitoring port to monitor other traffic in your network
- Includes filters, so you can find the information or monitor the device you want
- Offers the option to exclude filters expressly
- Stores all the stream and packet data. You can find the results of the PRTG data directory in the master node
- Works well for the following traffic: Web, mail, chat, remote control, infrastructure, NetBIOS, Citrix, and traffic through the TCP and UDP protocols
- It offers the choice to set the scanning interval
- Allows you to define the user groups that can access this sensor
Why do we recommend it?
Paessler PRTG is a large package of network monitoring tools, each of which is called a “sensor.” The bundle includes a packet sniffer, so you get a sort of Wireshark unit in the middle of this system. However, the tool doesn’t show all of each packet like Wireshark does. Instead, you use it like a protocol analyzer.
Who is it recommended for?
The PRTG packet sniffer reads packet headers and compiles statistics based on their content rather than showing or storing the packets. This is a much simpler tool to use than an actual packet capture tool because it doesn’t leave you with hundreds of records to comb through.
Pros:
- Uses a combination of packet sniffing, WMI, and SNMP to report network performance as well as discover new devices
- Autodiscovery reflects the latest inventory changes almost instantaneously
- Drag and drop editor makes it easy to build custom views and reports
- Supports a wide range of alert mediums such as SMS, email, and third-party integration
- Supports a freeware version
Cons:
- Is a very comprehensive platform with many features and moving parts that require time to learn
The cost depends on the number of sensors you use. The price slab of each is as follows.
- PRTG 500 – $1,750: Up to 500 sensors
- PRTG 1000 – $3,200: 501 to 1000 sensors
- PRTG 2500 – $6,500: 1001 to 2500 sensors
- PRTG 5000 – $11,500: 2501 to 5000 sensors
- PRTG XL 1 – $15,500: 5001 to 10,000 sensors
The first 100 sensors are free. Click here to get started.
2. SolarWinds Deep Packet Inspection and Analysis Tool
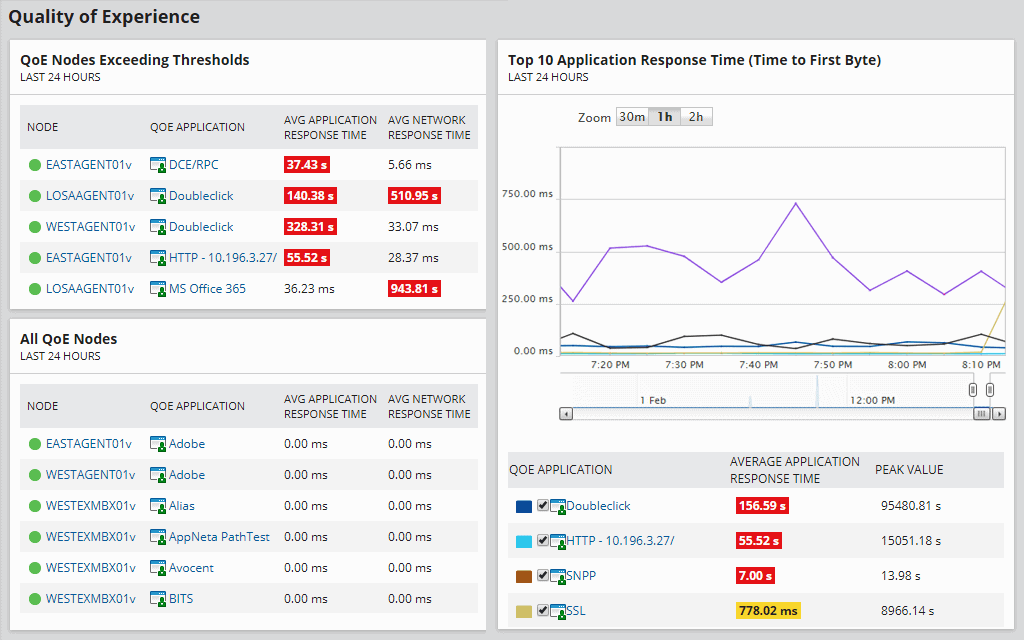
SolarWinds Deep Packet Inspection and Analysis comes with the Network Performance Monitor and offers insights into network slowdowns. The process of deep packet inspection is a technique that monitors the packets for network and application traffic.
Key Features
Some of the features of SolarWinds Deep Packet Inspection and Analysis are:
- Helps you to zero in on the causes of the network slowdown
- Makes it easy to determine whether issues are due to the network or application
- Calculates the response time for all applications
- Determines the impact on user experience
- Classifies and restricts the network traffic
- Makes it easy to identify the associated risk levels
- Sends alerts when the packet response time drops below significant levels
- Comes with a built-in dashboard for displaying the results
It gathers the connection-based and application-level interactions between the client and server and, using this monitors the performance and identifies any issues at the earliest.
Why do we recommend it?
SolarWinds Network Performance Monitor provides deep packet inspection and packet analysis but its main purpose is to track network device statuses with the Simple Network Management Protocol. You can also add on a traffic analysis system, called the NetFlow Traffic Analyzer that gives you packet captures, protocol analysis, and flow protocol sampling.
Who is it recommended for?
This is a great tool for big companies because it is able to track all devices automatically. That’s an advantage for companies that have too many devices to track manually. The benefit of the tool increases exponentially with the size of the network. The software runs on Windows Server.
Pros:
- Takes a holistic approach to server performance and health monitoring
- Supports auto-discovery that builds network topology maps and inventory lists in real time based on devices that enter the network
- Supports both SNMP monitoring as well as packet analysis, giving you more control over monitoring than similar tools
- Uses drag and drop widgets to customize the look and feel of the dashboard
- Robust reporting system with pre-configured compliance templates
Cons:
- Designed for IT professionals, not the best option for non-technical users
This tool comes as a part of the Network Performance Monitor that starts at $1,638. You can test-drive SolarWinds Deep Packet Inspection and Analysis for a fully functional 30-day free trial.
Conclusion
To conclude, advancements in technology have made encryption an essential part of every communication. But, unfortunately, it also has its downsides, especially for administrators who want to quickly analyze the contents and headers of the data packets sent to and from the network.
One of the biggest impediments is to decrypt the data at the SSL or TLS layer. While Wireshark is a good tool for packet inspection, it cannot read encrypted files, so you have to undergo a rather elaborate process to decrypt the SSL contents through Wireshark, so you can read through or analyze the contents.
An easier option is to use third-party tools like the Paessler Packet Sniffing Tool or SolarWinds Deep Packet Inspection and Analysis tool. Both are simple to use, and the results are presented through an intuitive dashboard.
Decrypt SSL with Wireshark FAQs
How does SSL decryption work with Wireshark?
SSL decryption with Wireshark involves capturing SSL-encrypted traffic and using a private key to decrypt the traffic to view the contents.
What do I need to decrypt SSL traffic with Wireshark?
To decrypt SSL traffic with Wireshark, you will need the private key used to encrypt the traffic, as well as a capture of the SSL traffic.
How do I capture SSL traffic with Wireshark?
To capture SSL traffic with Wireshark, you can use the "Capture" option and select the appropriate network interface to capture traffic from.
How do I import the private key for SSL decryption in Wireshark?
To import the private key for SSL decryption in Wireshark, go to the "Edit" menu and select "Preferences." Then, go to the "Protocols" section and select "SSL." Click the "Edit" button next to "RSA keys list" and add the private key file.
How do I apply the private key for SSL decryption in Wireshark?
To apply the private key for SSL decryption in Wireshark, select the SSL-encrypted packet in the capture and go to the "SSL" section in the packet details. Click on the "Pre-Master Secret" field and select "RSA keys list." The decrypted contents of the packet will be displayed.
What types of SSL traffic can be decrypted with Wireshark?
Wireshark can decrypt SSL traffic that uses the RSA key exchange algorithm.
Can I decrypt SSL traffic that uses other key exchange algorithms with Wireshark?
No, Wireshark does not support decryption of SSL traffic that uses other key exchange algorithms, such as Diffie-Hellman.
What are some common reasons for SSL decryption with Wireshark?
Some common reasons for SSL decryption with Wireshark include troubleshooting network performance issues, investigating security incidents, and analyzing web traffic.
Is SSL decryption legal?
SSL decryption may be legal or illegal depending on the jurisdiction and the circumstances of the decryption. It is important to consult legal and ethical guidelines before attempting SSL decryption.
Can SSL decryption impact network performance?
Yes, SSL decryption can impact network performance, as it requires additional processing power and may cause delays in network traffic.
What are some best practices for SSL decryption?
Some best practices for SSL decryption include obtaining legal and ethical approval, ensuring the security and privacy of decrypted data, and minimizing the impact on network performance.
What are some alternatives to SSL decryption with Wireshark?
Some alternatives to SSL decryption with Wireshark include using network taps or sniffers, deploying SSL intercepting proxies, and using network analyzers that support decryption.
What is the difference between SSL and TLS?
SSL (Secure Sockets Layer) and TLS (Transport Layer Security) are both protocols used to encrypt network traffic. TLS is the newer and more secure version of the protocol, and is often used interchangeably with SSL.